Tcp Connect to Af inet Failed Will Try Again in 5 Seconds
How to make your own free VPN with Amazon Web Services
@pabischoff UPDATED: October 18, 2019
Cyberspace users are spoiled for choice when information technology comes to VPN services, merely they either require a monthly subscription, aren't secure, or are just evidently wearisome. Thankfully, alternatives do be. They require a bit more than technical know-how, but if y'all want something done right, you accept to do information technology yourself.
To acquire how to make your own VPN, you can watch the video or read the commodity. Notation that the article contains some useful commands and configuration text that y'all tin can copy and paste for your convenience.Update: the video uses an sometime version of easy-rsa that is no longer available. When you get to the 8-minute mark, please refer to this commodity for like shooting fish in a barrel-rsa 3 configuration.
Getting started
Amazon Web Services offers 1 year of free virtual server space, provided you utilize less than predetermined amounts of bandwidth, time, and space. Even if you become over that limit, the price of running a server epitome on Amazon's Elastic Compute Cloud is probably less than y'all would pay for a VPN subscription.
Hither we'll explain two different ways to use Amazon'south Rubberband Cloud service, as well chosen EC2, to divert your connection through a private location of your choice: SSH Tunneling and OpenVPN. Each has advantages and disadvantages, so use the one y'all detect more than suited to your needs. No matter which you choose, you'll require the following:
- An Amazon Web Services account. This requires a credit card, but yous'll simply be charged for what you apply, which will likely be nothing if you're prudent most what yous're doing.
- PuTTy, if you lot're on Windows. OpenSSH via Cygwin is some other option, but I constitute it to be a pain. Linux and Mac computers already have SSH prompts built into their boxes and terminals. You'll besides demand PuTTy'due south sister primal generation plan, PuttyGen. You could also utilise a PuTTY alternative, some of which also contain SCP and FTP.
- WinSCP, or an equivalent FTP client to move files betwixt your local figurer and your EC2 instance.
- A bones working knowledge of Unix commands and how servers work with clients will be massively helpful in troubleshooting should something not become exactly as planned.
- OpenVPN GUI, installed in the default location and with the default settings on your PC
Setting up AWS
In one case you've signed up for an Amazon Web Services account, here'south how to launch the server that we'll employ for our VPN::
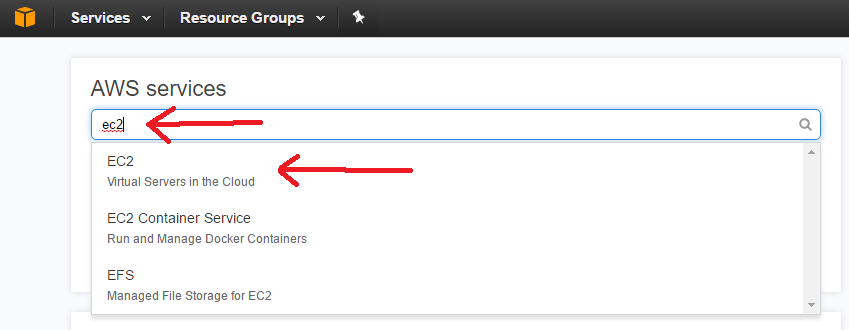
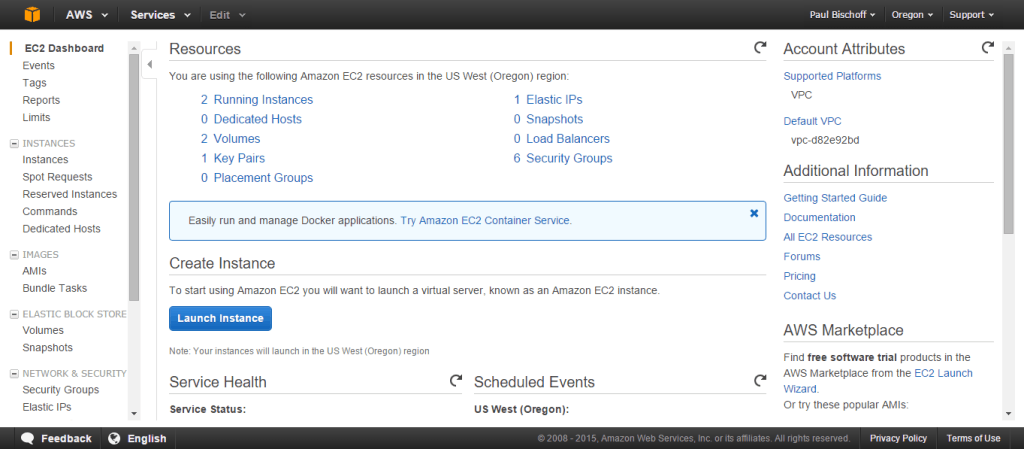
- Log into your Amazon Web Service account and head to the EC2 dashboard.
- On the top right, you can choose the location where we'll be setting upwardly your VPN. Click Launch Instance.
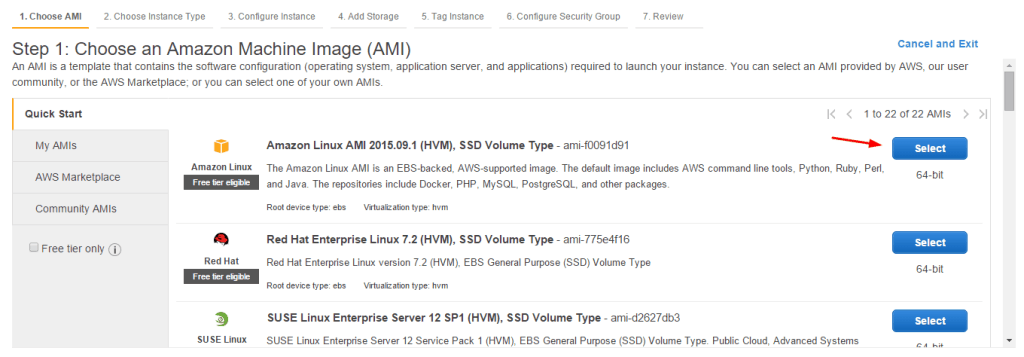
- Cull whatsoever Linux AMI is listed as "gratuitous tier eligible." At the fourth dimension of writing this commodity, that's the Amazon Linux AMI. Get on to the next stride.
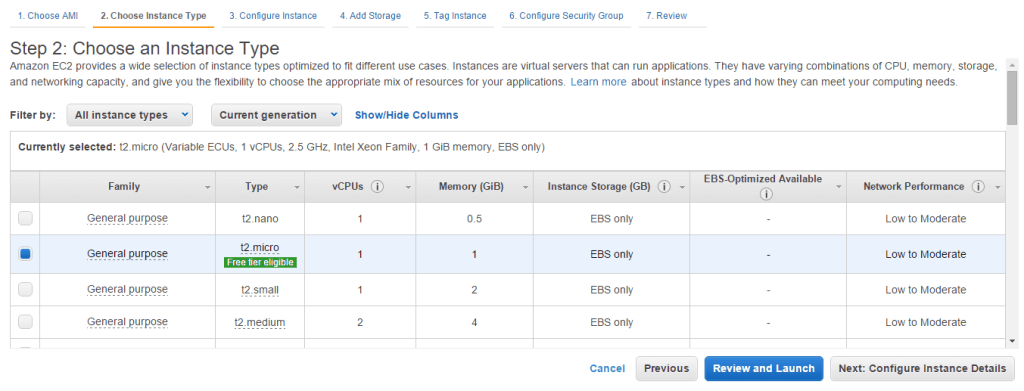
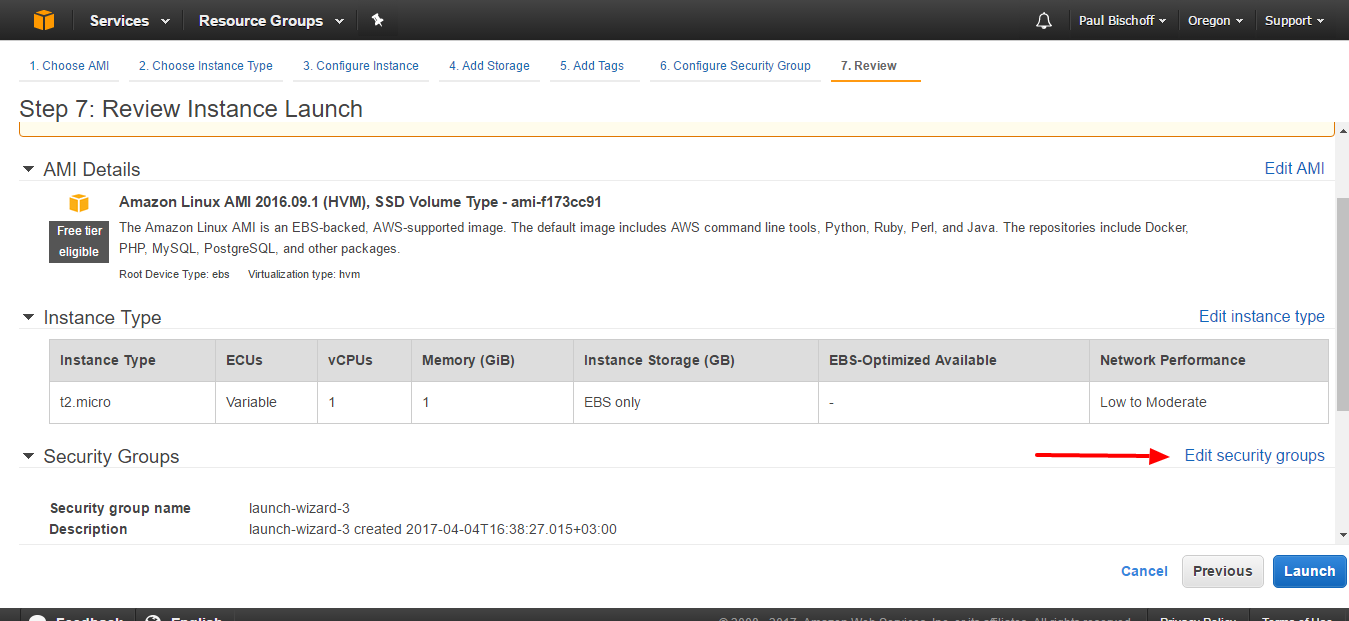
- Here choose a t2.micro case that'due south also costless tier eligible. Click "Review and Launch."
- On the next folio, click Edit Security Groups.
- Yous'll need to edit the security group to only allow traffic from your computer to admission the VPN or proxy. You lot should have one rule already in identify for connecting to your server via SSH, which we'll use later. We'll need to add another to permit OpenVPN connections, which use port 1194 by default. For simplicity's sake, nether the Inbound tab, click the Add rule button. Set the Type to Custom UDP, thePort Range to1194, and the Source to Anywhere.
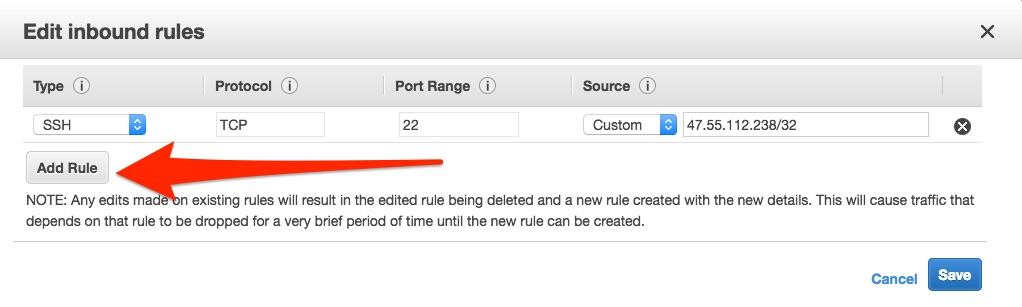
- Hit Save.

- Click "review and launch," and then "launch" on the next page.
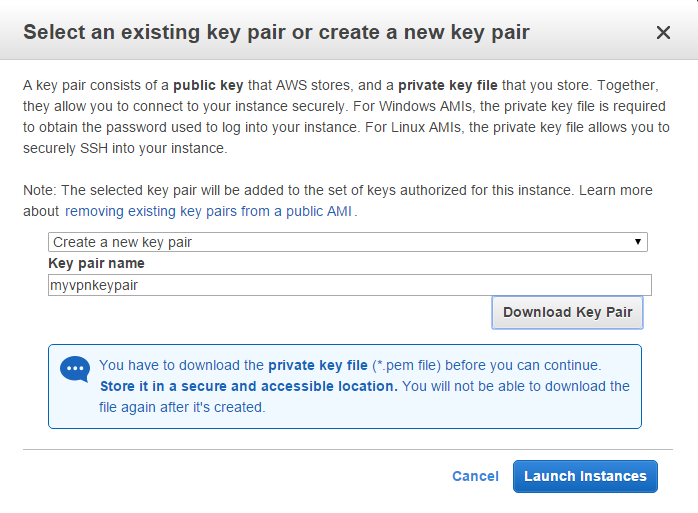
- Now you'll want to create a fundamental pair, which sort of works like a password that you'll utilise to connect to the virtual server you lot're creating. Select "create a new key pair" from the dropdown carte du jour and name it whatever you similar. Click the button to download the key pair. Store it somewhere safe.
- The next folio should alert you that the example is launching. Scroll to the bottom and hit "View instances." Here you'll see a list of any instances y'all've launched, which if this is your beginning fourth dimension using EC2 volition simply be ane.
Connect to the server with PuTTy
Nosotros tin can connect to our EC2 instance with PuTTy, but first nosotros'll need a proper cardinal file to get connected. When you installed PuTTy, you lot should accept also installed PuTTygen. Become alee and run it now. PuTTy and PuTTygen both run right out of the box as .exe files with no need to install.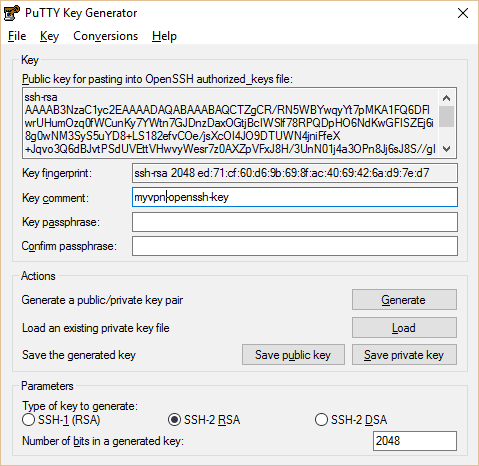
- Open up PuTTygen, click Load.
- Navigate to the .pem key pair file yous downloaded before and load it into Puttygen. Y'all'll accept to select the option to testify all file types for the .pem key to prove upward. Hit "Save Individual Key." The file name must be identical to the .pem central. You tin create a passphrase for the private key if you want.
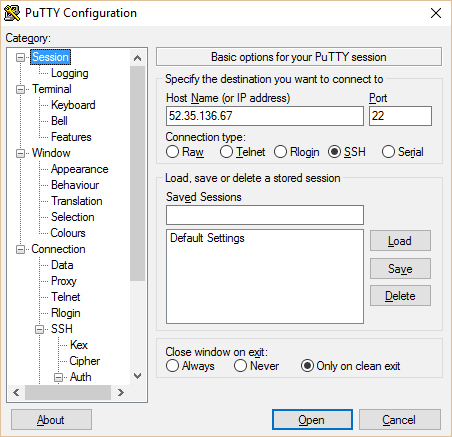
- Now close out of PuTTygen and open PuTTy. Copy your instance's public IP from the EC2 panel into PuTTy. Type in a name for your session and hit salve.
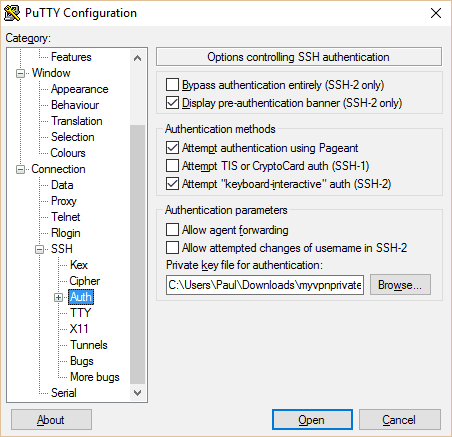
- In the left pane, navigate to "Auth" under SSH. Click the scan button at the lesser and navigate to the private central you just generated.
- Dorsum on the main Session folio, name and save your session contour so you can chop-chop connect the next fourth dimension you utilise PuTTy. And so Click Open.
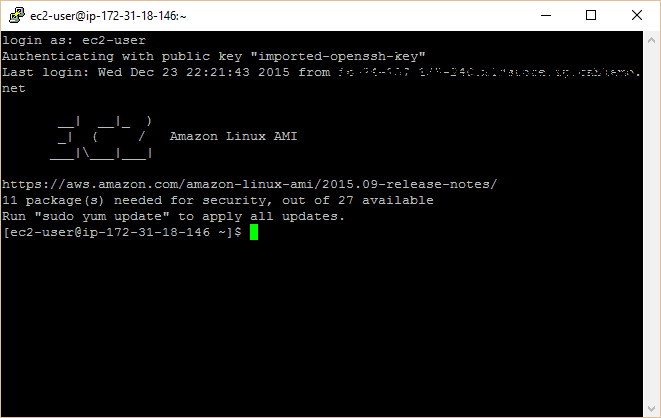
- A prompt volition appear asking you lot for a username. This differs based on what blazon of server you lot ready at the beginning. For the Amazon Linux AMI, it's "ec2-user".
SSH Tunneling (optional)
To begin with, we're just going to reroute spider web traffic through the instance we created using SSH tunneling and a proxy. This is a quick and dirty way to go around a firewall or geographic lockout. It's not quite a VPN–it's best for lite spider web traffic and won't work with everything–but it's much more uncomplicated to gear up up. Withal, setting upwards SSH tunneling is entirely optional, then feel free to skip to the side by side section.

Open PuTTy and navigate to Tunnels in the left pain. Add port 8080 with Machine and Dynamic selected. Go dorsum to the Session page and hitting Save once more and so you don't have to do all this over once more. And then click Open.
Now yous're connected to your server, but you still need to route your web browser's traffic through it. If you lot use Firefox, this tin be done in your browser settings. If y'all use Chrome, download the Proxy Switchy extension. If you adopt to create a fully functioning VPN rather than just a proxy for your browser, skip to the adjacent section at present.
In Firefox:
- Go to Tools > Options > Advanced > Network > Connection > Settings > Manual proxy configuration
- Set SOCKS Host as 127.0.0.1 and the port every bit 8080 (or any y'all set the tunnel port to on PuTTy).
- Click OK to save
In Chrome Proxy Switchy
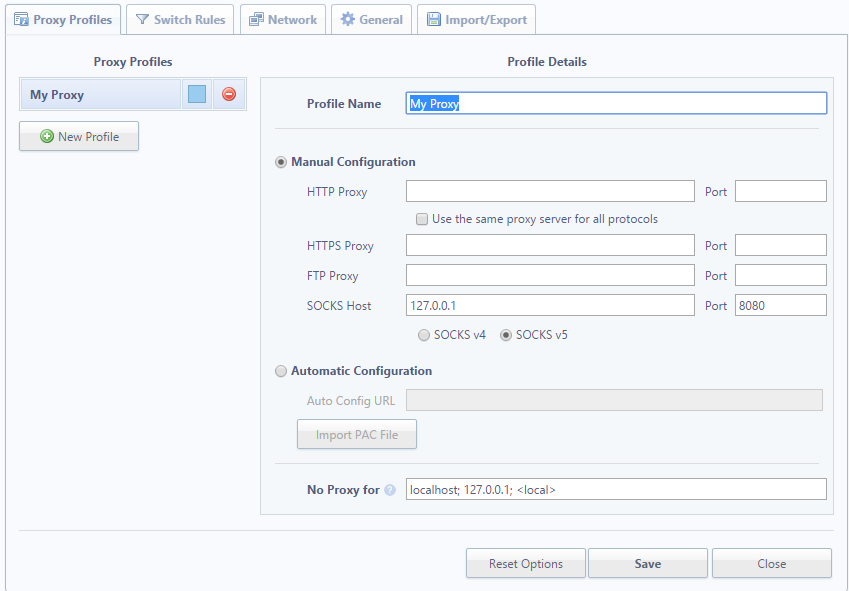
- A setup page should appear equally soon as yous install the extension, or click the icon in the superlative right of Chrome and click Options.
- Proper name the profile whatever you like. Under Transmission Configuration, set the SOCKS host to 127.0.0.ane and the port to 8080 (or whatever you set up the tunnel port to in PuTTy. Leave everything else blank.
- Hit Salve, then click the icon over again to select your proxy profile.
Voila! Your browser traffic is at present existence funneled through your EC2 instance. This will work fine for basic browsing, but some websites might run into issues and apps other than your spider web browser will still use the direct connection. To create a full-on VPN that reroutes all your internet traffic, read on.
Prepare OpenVPN on the server and customer
OpenVPN is a free open up source tool that will let y'all run a total-on VPN through your Amazon EC2 instance. That means all your net traffic goes through it, non just your web browser traffic like the proxy above. Desktop programs such as Steam or Spotify work amend with this approach.
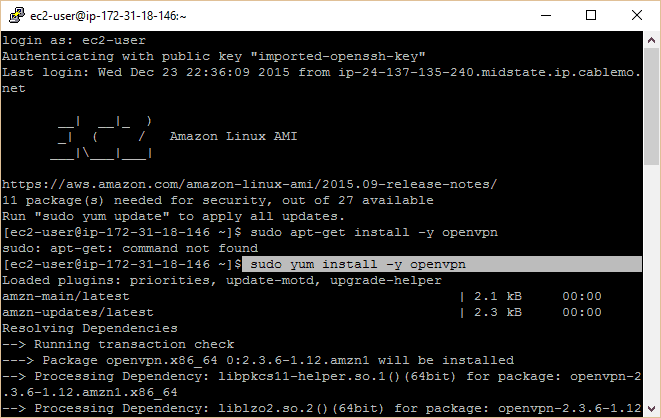
Connect to your EC2 instance using PuTTy co-ordinate to the instructions in a higher place. You should have a control prompt in front of you lot that says Amazon Linux AMI. Run the following commands (type or re-create/paste them and press enter):
sudo yum install -y openvpn sudo modprobe iptable_nat echo 1 | sudo tee /proc/sys/net/ipv4/ip_forward sudo iptables -t nat -A POSTROUTING -s x.four.0.1/ii -o eth0 -j MASQUERADE sudo iptables -t nat -A POSTROUTING -southward 10.8.0.0/24 -o eth0 -j MASQUERADE Just a quick note here. You might have noticed in the screenshot that I incorrectly tried to download and install OpenVPN using the "apt-get" command instead of "yum". Another versions of Linux still utilise apt-get, and then if yum doesn't work for you, try this command instead:
sudo apt-get install -y openvpn A bunch of text will flash on the command prompt while information technology installs OpenVPN. The other three commands gear up upwards IP forwarding, which is necessary for the VPN to work.
Method #i: Setting upward PKI authentication with easy-rsa (recommended)
In the original version of this tutorial, we prepare up OpenVPN with static encryption and a .ovpn file. While that works, it only allows one device to exist continued at a time, and the fact that you only ever use ane central ways it'southward less secure. We at present recommend readers use easy-rsa to gear up authentication, which is more secure and allows for any number of devices to be simultaneously continued. However, if you desire the one-time version with static encryption, skip to it past clicking here.
May 2018 update: This commodity has been updated for use with easy-rsa three.
OpenVPN and easyrsa server setup
Ideally, you would generate all the keys and certificates y'all demand on a separate device from the VPN server for maximum security. This can be quite dull, yet, and so nosotros're but going to generate both customer and server credentials on the server, and so move the files where nosotros need them from there.
- Easy-rsa is not available in the default yum package list, so we'll demand to enable the EPEL repo to install it. Blazon the following into the PuTTy last and hit Enter:
-
sudo yum install piece of cake-rsa -y --enablerepo=epel
-
- Make an easy-rsa directory in your OpenVPN install directory. Re-create the files from your easy-rsa installation (latest version is 3.0.3 equally of fourth dimension of writing) to the new directory:
-
sudo mkdir /etc/openvpn/easy-rsa cd /etc/openvpn/piece of cake-rsa sudo cp -Rv /usr/share/easy-rsa/three.0.3/*
-
- Now we're ready to fix our certificate authorisation. Commencement by initializing a new PKI (public primal infrastructure) directory, so build a certificate authority keypair.
-
sudo ./easyrsa init-pki sudo ./easyrsa build-ca
-
- Enter a PEM passphrase. This is not required just recommended. If someone gets a concur of your CA somehow, they will non be able to create keys or sign certificates without the password.
- Yous'll exist prompted to enter a common name. Call information technology whatever you desire or just hit Enter to leave it as the default value.
- Side by side, we'll generate a Diffie-Hellman key, which provides perfect frontwards secrecy:
-
sudo ./easyrsa gen-dh
-
- This command can take awhile. It will generate a file chosen dh.pem. In one case finished, nosotros move on to the server credentials. For convenience, nosotros won't password protect these, just you're certainly welcome to practice then if you lot want even harder security.
-
sudo ./easyrsa gen-req server nopass
-
- Hit Enter to leave the common proper name as server. Once the cardinal pair is generated, sign the certificate:
-
sudo ./easyrsa sign-req server server
-
- Type yes to confirm and enter your CA password if you set one before.
- Now we'll set up the client. Over again, nosotros won't set up a countersign on this but you are welcome to. Note that if you want to configure automatic VPN startup, it'south best not to gear up a password.
-
./easyrsa gen-req client nopass
-
- Hit Enter to leave the mutual name equally client. Now sign information technology:
-
sudo ./easyrsa sign-req client customer
-
- Type yes to confirm and enter your CA countersign if y'all set one.
- Next, nosotros'll generate a TLS key for perfect forrard secrecy in OpenVPN, which ensures by session information cannot be decrypted even if an attacker gets hold of our private primal.
-
cd /etc/openvpn openvpn --genkey --undercover pfs.key
-
- We've at present generated all of the credential files we need. Next, nosotros'll create an OpenVPN server configuration file. We've already got 1 written up for yous below, then all you need to do is re-create and paste if you've followed forth from the beginning. Get-go past navigating to the OpenVPN directory and creating a new file:
-
cd /etc/openvpn sudo nano server.conf
-
- You lot are now in the nano text editor. Copy and paste the following config, then hit CTRL+O to save, Enter to confirm, and CTRL+Ten to exit. (Hint: you can paste text from your clipboard into PuTTy only by right-clicking)
-
port 1194 proto udp dev tun ca /etc/openvpn/piece of cake-rsa/pki/ca.crt cert /etc/openvpn/easy-rsa/pki/issued/server.crt key /etc/openvpn/easy-rsa/pki/individual/server.cardinal dh /etc/openvpn/easy-rsa/pki/dh.pem cipher AES-256-CBC auth SHA512 server x.8.0.0 255.255.255.0 push "redirect-gateway def1 bypass-dhcp" button "dhcp-option DNS 8.eight.8.8" button "dhcp-pick DNS 8.8.4.4" ifconfig-pool-persist ipp.txt keepalive 10 120 comp-lzo persist-primal persist-tun status openvpn-status.log log-suspend openvpn.log verb three tls-server tls-auth /etc/openvpn/pfs.central
-
- The server is now configured. We just need to start up OpenVPN. We'll starting time it equally a service so that fifty-fifty after you close PuTTy, it will go along to run until the server is either shut down or yous manually end the service.
-
sudo service openvpn showtime
-
Edit:Some readers accept pointed out that their VPN servers terminate working afterward a server reboot or maintenance. This happens occasionally with micro tier EC2 instances. To foreclose this, we'll utilize a command and bash script courtesy of Matt Doyle in the comments section. Start with this command:
sudo chkconfig openvpn on While you're still in etc/openvpn, usenano server.shto create a new text file and paste the following into it:
#!/bin/sh echo i | sudo tee /proc/sys/net/ipv4/ip_forward sudo iptables -t nat -A POSTROUTING -due south 10.four.0.one/2 -o eth0 -j MASQUERADE sudo iptables -t nat -A POSTROUTING -s ten.8.0.0/24 -o eth0 -j MASQUERADE
Employ CTRL+O to salve and CTRL+X to exit.
The command will ensure OpenVPN starts when the server boots, and the script will ensure the necessary routes are set upwardly in iptables to allow OpenVPN traffic.
OpenVPN and easyrsa customer setup
Now that the server is configured, we need to gear up upwards the customer. To exercise that, we'll have to move the necessary document and key files from our server to our client device. With PuTTy all the same open and running every bit root, we first need to change the permissions on these files so that we can access them. Nosotros'll likewise put them all in i place to make things a bit easier.
- To access some of these files, we'll need to be root user. To practice that, type:
-
sudo su
-
- This volition make you lot the root user and grant authoritative privileges. Now enter the following commands. The last command lowers the required permissions to access these files. Note that information technology's important to alter them dorsum when finished.
-
cd /etc/openvpn mkdir keys cp pfs.key keys cp /etc/openvpn/easy-rsa/pki/dh.pem keys cp /etc/openvpn/like shooting fish in a barrel-rsa/pki/ca.crt keys cp /etc/openvpn/piece of cake-rsa/pki/private/ca.key keys cp /etc/openvpn/easy-rsa/pki/private/client.central keys cp /etc/openvpn/easy-rsa/pki/issued/client.crt keys chmod 777 *
-
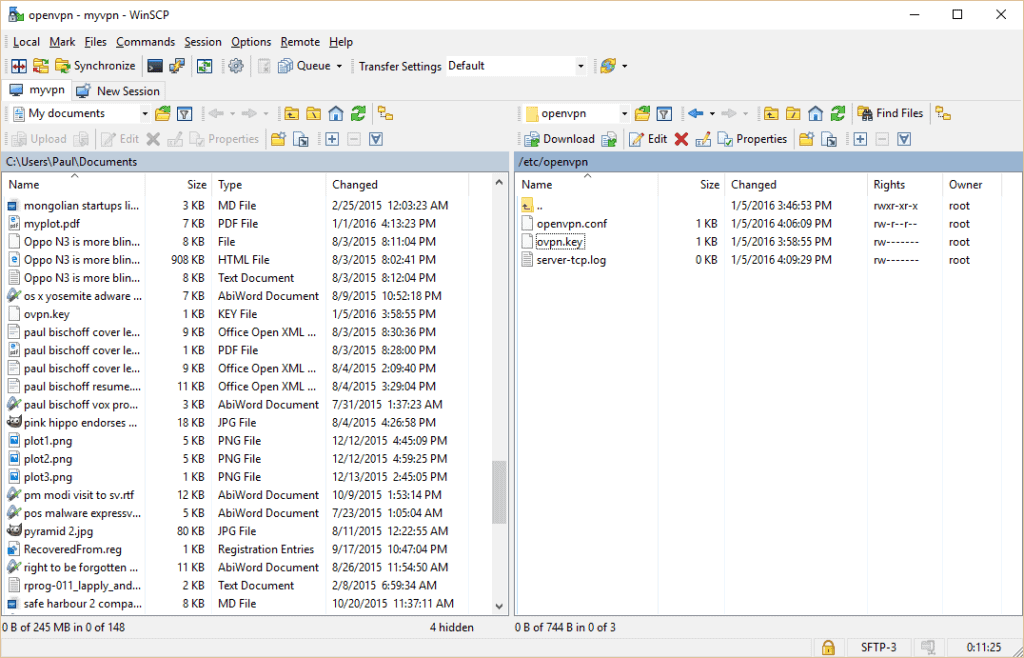
- To get the files off of our server and onto our PC, we'll use a gratuitous program chosen WinSCP. Simply utilize the default installation options. One time that's washed, a window should popular up prompting you to import your server authentication details from PuTTy. Select the ane we made above and continue.
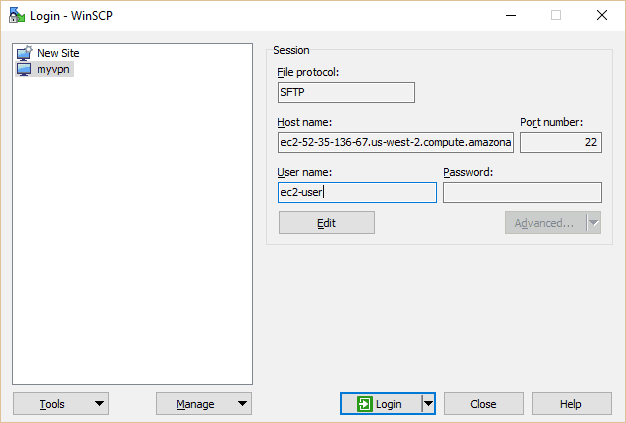
- Select myvpn (or any you named yours) and hit the Edit button. Blazon in ec2-user under user proper name. Click on Login.
- If this isn't your outset time using WinSCP, you can ready the .ppk file you used in PuTTy by clicking Editand Advanced. Become toSSH > Authentication > Private primal file and navigate to your PPK file.
- In the host proper noun field on the master page, you lot can enter either the IP address or domain of your EC2 instance. Be sure to save your settings, then hitLogin.

- In the correct pane, navigate to the directory containing your key files, in this case /etc/openvpn/keys

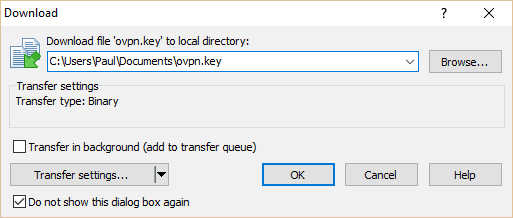
- Highlight the vi files yous'll demand: client.crt, customer.key, ca.crt, dh.pem,pfs.primal, andca.fundamental (not shown due to article update). Hitting the green Download button. It doesn't really matter where they go on the left pane so long as yous don't need admin privileges to access information technology. We put the files on our desktop for simplicity'south sake. However, you'll want to store the ca.key file somewhere safety, such as a USB drive.
- The concluding loose terminate nosotros need to practice tie up is removing the ca.cardinal file from the server. The CA, or certificate authorisation, is used to sign client certificates, and, if it is always compromised, you lot tin can never trust certificates issued by that CA over again. While this isn't necessary for the VPN to work, we strongly recommend doing it, particularly if you didn't fix a countersign for the CA. Make sure you've all the keys and certificates for every device you desire to connect before removing the file. If yous desire to add more at a later time, you will have to move the ca.key file back onto the server.
- In one case you take the CA key safely stored somewhere other than the server, get into PuTTy and remove both the original ca.key and the re-create we made from the server:
-
sudo rm /etc/openvpn/piece of cake-rsa/pki/private/ca.key sudo rm /etc/openvpn/keys/ca.key
-
- One time the files have downloaded, we need to restore their stricter permissions on the server and then non just anyone can admission them. Back in PuTTy:
-
cd /etc/openvpn/keyssudo chmod 600 *
-
- On your PC, cut and paste those five files from wherever you lot downloaded them into your OpenVPN config binder. In this case that'due south C://Program Files//OpenVPN//config.
- Lastly, we need to create a customer configuration file. Open up your favorite plaintext editor (Notepad works fine) by right clicking and selecting Run as administrator and paste the following config, replacing YOUR.EC2.INSTANCE.IP with the IP address of your EC2 instance:
-
client dev tun proto udp remote YOUR.EC2.INSTANCE.IP 1194 ca ca.crt cert customer.crt cardinal client.key tls-version-min one.2 tls-cipher TLS-ECDHE-RSA-WITH-AES-128-GCM-SHA256:TLS-ECDHE-ECDSA-WITH-AES-128-GCM-SHA256:TLS-ECDHE-RSA-WITH-AES-256-GCM-SHA384:TLS-DHE-RSA-WITH-AES-256-CBC-SHA256 zippo AES-256-CBC auth SHA512 resolv-retry infinite auth-retry none nobind persist-fundamental persist-tun ns-cert-type server comp-lzo verb 3 tls-client tls-auth pfs.cardinal
-
- This is a Windows config file for the OpenVPN GUI, so we'll salve information technology as client.ovpn. Other OpenVPN clients might use the .conf extension instead. Whatever the example, make sure your text editor doesn't add the .txt extension after saving. Relieve it into the same location as your central and certification files: C:\\Program Files\\OpenVPN\\config
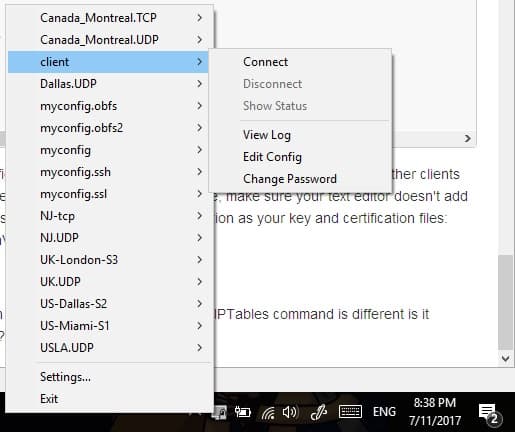
- Now run the OpenVPN GUI in administrator way by right clicking it and selecting Run as administrator. Correct click the icon in your system tray and connect with the customer configuration we just set. A status screen with loads of text volition flash beyond the screen, and and then the icon will plow green.
Congratulations! You lot are at present connected to your bootleg VPN.
Method #2: Static encryption (easier, merely not recommended)
In this method, we'll create a shared key for authentication. It's sort of similar a file that acts equally a password. It's easier to gear up but only allows a single device to be connected to the VPN at whatever once, and is less secure than the piece of cake-rsa method above.
- In PuTTy Blazon in the post-obit commands and hit enter:
-
cd /etc/openvpn
sudo openvpn --genkey --secret ovpn.key
-
- Now nosotros're going to create a server config file for our VPN. Type the following command to create a blank text file in a very bones text editor inside the terminal:
-
sudo nano openvpn.conf
-
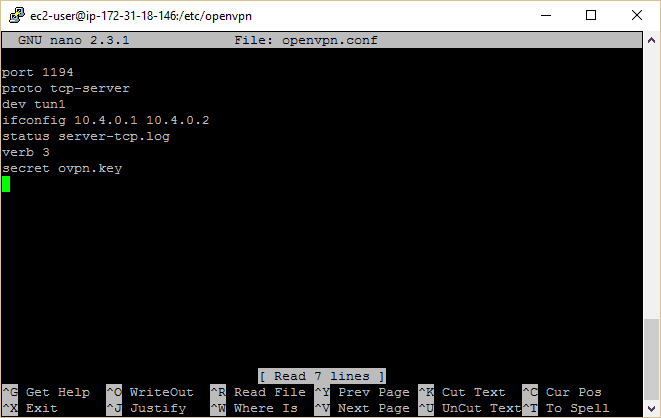
- Type in the following configuration. Y'all can find more than options on the OpenVPN website if you want to play around with this afterwards, just brand certain yous know what you lot're doing commencement.
-
port 1194proto tcp-serverdev tun1 ifconfig ten.4.0.1 x.4.0.2 status server-tcp.log verb iii secret ovpn.key
-
- At present hit CTRL+O (that'southward the letter 'O' not zero) and hit enter to relieve the file. Then striking CTRL+X to exit the text editor. Back at the command prompt, information technology's fourth dimension to burn up OpenVPN:
-
sudo service openvpn starting time
-
- Next we need to get the shared fundamental from the server to your local figurer. Outset nosotros demand to change the permissions on that file so we can admission it using the following command:
-
sudo chmod 777 ovpn.key
-
- If at any point y'all accidentally close PuTTy or information technology just craps out, you tin navigate dorsum to your open VPN installation directory afterwards reconnecting using this control:
-
cd /etc/openvpn
-
- To make this as easy as possible, download and install this costless application, WinSCP (Mac users volition have to find another FTP customer. Don't worry, in that location are lots of them). But use the default installation options. Once that'south done, a Window should pop up prompting you to import your server authentication details from PuTTy. Select the one we made above and keep.
- Select myvpn (or whatever you named yours) and hit the Edit push. Type in "ec2-user" under user name. Click on Login.
- Now you can move files betwixt your EC2 case server and your local computer. On the right manus console, navigate upward as far as you lot tin can, then go to etc/openvpn. Hither you'll find the ovpn.fundamental file that we need. Click and elevate it into the folder of your choice, merely remember where y'all put it every bit we'll desire to movement it afterward.
- Now that you take the central, we need to re-use the old permissions so not just anyone tin catch it. Back in your PuTTy last, enter:
-
sudo chmod 600 ovpn.central
-
- Information technology's time to download the OpenVPN client and GUI for your local computer. Become to the OpenVPN downloads page and choose the appropriate version for your operating system. Install information technology with the default settings.
- Launch OpenVPN and it should appear as an icon in your system tray. Open upward a file explorer and navigate to where y'all installed OpenVPN, probably in your Program Files binder. Move the opvn.central file we downloaded from the server to the config folder found here (C:/Program Files/OpenVPN/config … if you used the default installation directory on Windows).
- Next, we demand to create a config file for the local machine to match the one nosotros made on our server. Open up Notepad and paste the following, replacing the IP address afterward "remote" with the IP of your EC2 instance (if you've forgotten it, detect information technology in your AWS Console under EC2 Instances). Besides, double check that the full file path pointing to your key is right.
-
proto tcp-client
remote <your EC2 IP here> port 1194 dev tun secret "C:\\Program Files\\OpenVPN\\config\\ovpn.key" redirect-gateway def1 ifconfig 10.4.0.2 10.4.0.1
-
- Relieve it as myconfig.ovpn (brand sure your text editor doesn't append it as myconfig.ovpn.txt by mistake) in the config folder of your OpenVPN installation, the same place every bit your opvn.key file.
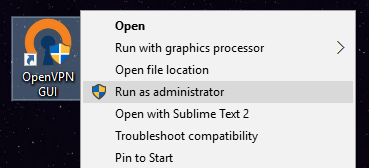
- Right click on the OpenVPN icon in your organisation tray and click Go out to quit. Now commencement it up again–either from the desktop shortcut or from the Program Files folder–but this fourth dimension use correct click and hit "Run equally administrator". If you lot don't run OpenVPN as administrator on Windows, it probably won't work.
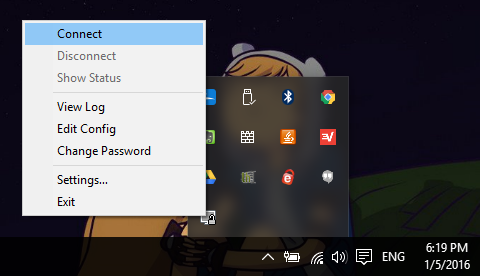
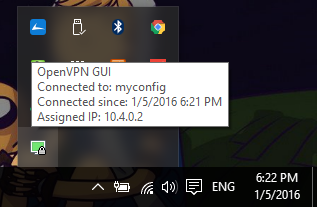
- Correct click the organization tray icon and click Connect. The OpenVPN GUI should popular upward showing you the connectedness status. Bold information technology worked, the arrangement tray icon will turn greenish. Go to Google and blazon in "What'due south my IP?", and it should return the IP address of your Amazon EC2 Instance.
Congratulations, you just fabricated your own VPN!
Additional notes
If you want to protect your VPN from deep packet inspection, a technique used by censorship regimes in places similar Mainland china and Syria to cake OpenVPN connections, bank check out our tutorial on setting up Obfsproxy. Note this tutorial was written as a sort of sequel to the older Method #ii in this article, so if y'all used easy-rsa, it will require some additional configuration.
Remember to keep your bandwidth within Amazon's complimentary tier limits. The easiest way to do this is to right click on your instance in the AWS Panel and click on the "Add together/Edit Alarms" link. You lot can set your server to stop or even end afterward a few hours of inactivity. The gratuitous tier allows for 750 hours per calendar month (which covers the whole month), so you shouldn't need to exercise this. Those users by their initial free year of service or doing more with their server, nevertheless, can prevent unnecessary charges for unused server time.
Somewhere in this tutorial, something volition probably go wrong for you. If you really desire a VPN but aren't willing to do your fair share of troubleshooting, it's probably best to opt for a paid VPN service. They also allow you to channel your cyberspace traffic through multiple geographic locations, whereas an EC2 instance is limited to just one. Bank check out our VPN reviews here!
Hardcoding DNS servers into your VPN
If y'all demand to set specific DNS servers to use with your VPN, there are a couple of options.
To "push" the DNS server to the client, add this line to the server config. This will affect all of the devices that connect to your VPN (quotes included):
push button "dhcp-option DNS 45.56.117.118"
Alternatively, you tin set the DNS in an individual client config using:
dhcp-choice DNS 45.56.117.118
In these examples, I used an OpenNIC public DNS server with bearding logging located in the US. Yous can observe a OpenNIC server in the state of your choice and filter by features like anonymous logging and DNSCrypt here.
Special cheers to Dctr Watson's blog, which I leaned on every bit a resource when writing this article.
Jon Watson (no relation, I think) contributed to this article.
nortonbreventowne.blogspot.com
Source: https://www.comparitech.com/blog/vpn-privacy/how-to-make-your-own-free-vpn-using-amazon-web-services/
0 Response to "Tcp Connect to Af inet Failed Will Try Again in 5 Seconds"
Postar um comentário